Harriet: My First Wired Bra

It appears to be bra month around here at Phee Fabrics if you haven’t noticed already. I started off with a pattern that has been in my stash for a couple of years, then once I received my lace realized that it wasn’t going to work for my pattern. So I set to find a different pattern because I had a look I was going for, and had to use this beautiful black and white lace.

bw_lace__03910.1548351602

I then decided to use Cloth Habit’s Harriet Bra Pattern in view C, it comes in sizes 28-41 A-H. I used the Cloth Habit uses the UK method for bra sizing, and provides a sizing guide on their site so you can figure out if the pattern will work for you before you buy. Since I haven’t worn a real bra in far too long, my closest thing to a real bra is from Athleta and comes in a size medium made for cups A-C, so I’m not sure how to compare the sizes. I made a size 32DD, and the fit worked out pretty well, although I did find the band a tad tight.

DSCF2036

With this being my first underwire bra that I’ve sewn, and first lace item, I made a lot of mistakes with the actual sewing (I’ll share some tips at the end of my post so you don’t make the same ones). I used Phee’s Heavy Duty Underwires, which I initially ordered in what I thought was my bra size, plus one size over and one size under. I found out that the largest of the three would work for only my right breast, and it was really easy to send back the other 2 and get the next 2 sizes. I loved that I wasn’t stuck with wires that wouldn’t work for me and I got the wires I did need.

DSCF2040

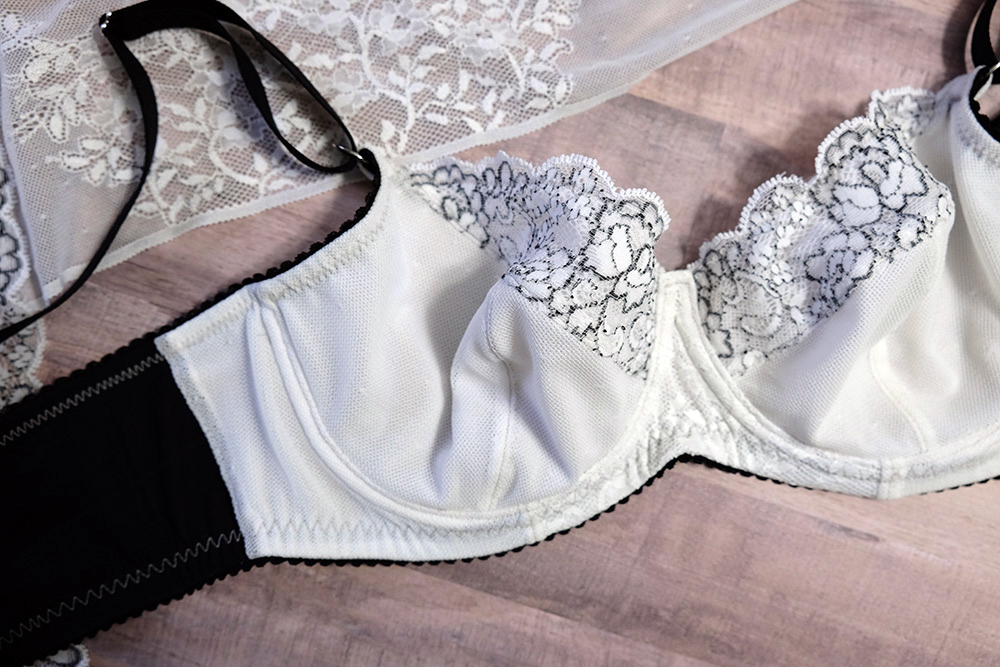
I got a little scissor happy and started cutting into my lace and quickly realized it wasn’t going to look the way I wanted it to. So I ordered some additional 9” wide white lace to use for the rest of the cups and the cradle. I used a lot of different materials on this bra, but with them all coming from Phee, they worked together beautifully. I wanted to pull from the black in the lace at the top of the cups, so I opted to use black notions and black powernet for the wings of the bra. I love how they all come together.

DSCF2038

Materials Used

Fabrics/Laces:

Notions:

Tips

  • Follow the instructions on the pattern, and if they don’t make sense, then see if your pattern maker has a photo tutorial on their website. I don’t suggest trying to make things up as you go, that’s where I got in trouble. I decided to not follow the instructions and it made things really hard in the end. Cloth Habit does have a great Sew Along if you need more help.
  • The Harriet calls for a 1/2” band elastic, I didn’t pay any attention to this, and I should have lengthened the seam allowance on the cradle and band to account for this and make for easier sewing.
  • Don’t stretch elastic when it says hold taunt, I did this on my clear elastic at the top of my cup on my scalloped elastic, and now it’s not smooth, it pulls in on my breasts.
  • Practice stitches on scraps of the same lace/powernet/fabric combos before actually sewing on your bra. I don’t know the last time I’ve used my seam ripper as much as I did on one project as I did on this bra. And trying to take seams out of a lace bra is not the easiest.
  • When sewing your hook and eye on, make sure they are facing the correct direction before sewing. I accidentally sewed my hook on so that it faces out.

Happy bra sewing!

Note: This post contains affiliate links to products. All opinions and thoughts are my own. I may receive a commission for purchases made through these links.

If it’s free, maybe it’s NOT for me

Disclaimer: This blog post contains affiliate links, as noted. If you make a purchase using one of my affiliate links, it will cost you nothing extra, but will send a little “cha-ching!” my way. 🙂

I was SO EXCITED when I heard that Phee Fabrics (aff) was stocking bra-making supplies! I have always had a hard time finding ready-to-wear bras. I’ve struggled with my weight my whole life, and my breasts are far from being firm and perky. Plus I’m now 45 and have had a child that I breast-fed for over a year, so…

Anyway…I thought, now that I have been sewing for myself for a few years, why not try making my own bra? I thought that I would start with something simple…a bralette..and a free one at that! I picked the Barrett Bralette from Madalynne Intimates. This free download comes in sizes XS-3XL, and it states in the pattern that it’s “generally intended for smaller sizes – cup sizes AA-C”.

I was excited to get started, and selected my supplies from Phee!

BaretteBralette1

Affiliate links to supplies:

Note: You can also just buy a convenient Bra Kit (aff) and get everything you need!! (P.S. I ended up not using the hook and eye fastener.)

I had downloaded this pattern a while ago, and thought it so cute! I really should have paid attention to the fact that it looked cute on a mannequin that had pretty much no boobage.

I’m not even sure what size I am in ready-to-wear bras, as the last time I bought them (which was when I finally ditched my nursing bras 12 years ago), I ended up with some that were for a “range” of sizes. I wear the XS, which equates to a 32A-C, I think. Based on my measurements, I printed the size L in the Barrett. I cut out my pieces and got ready to get started.

Once I had the front/side cups and band sewn together, before adding any elastics, I tried it on, and thought it was a bit big through the back band. I thought maybe adding the elastics would tighten it up, so I just forged ahead. I should have gone with my instincts at that point, which were telling me to redo the back band and take out some of the excess, but, not being experienced in bra-making at all, I didn’t.

On to the elastic. Here is where the pattern failed me. There are no measurements given for the lengths, which was fine for the front neck and the little cut-out in the front, as they apparently should be 1-1. However, all the instructions say about the underarm/back elastic is that you should stretch it, but then in states “I didn’t use any calculation, and have developed a “feel” for how much to stretch, which you will too with practice ;)”. Um…thanks?

So, I was really just winging it from this point. I started pinning/clipping my elastic, stretching as I went, and hoped for the best. Sewing it was a nightmare…things kept shifting, and then weren’t caught with my zigzag, so I had to unpick and redo…multiple times.

Then came the underbust/band elastic. Again, no measurements given, so I went with 2″ less than my underbust measurement. Once I got it sewn, I tried it on, and wow…SO BIG. At this point, I was not going to take all the elastic off and redo the back band…I had already unpicked way too many times, so I went to my trusty serger and just serged off about 3″ on the back.

That was the only way to somewhat salvage this, but to be honest, this bralette is pretty much unwearable for me. There isn’t any real support, despite using the powernet for my lining layer, and it’s really hard to get on and off over my shoulders. I don’t think a bralette is for me. I need more support, so maybe I just need to find another pattern and try again. In this instance, “if it’s free, it’s for me!” was not the case!!

Here are the results…and I’m only smiling because my husband made me laugh commenting on my previous “grumpy face”. Which was caused by making this bra.

BaretteBralette4

Some good points about this bralette – the seams are all fully-encased, which is nice, and the instructions are pretty good, except for adding the elastics. She recommends using a spray adhesive for the front cups, which I didn’t have, but used a glue stick. I would also either baste or glue the side cups/back band AFTER attaching them, as they really tried to shift on me while adding the elastics. Not fun.

In conclusion, I would NOT recommend this pattern for a beginner. Not unless you are prepared to start with scrap fabrics and maybe sacrifice some elastic as you go. I know I will not be making this pattern again. The fit and style are just not right for me. The only thing that made this project somewhat bearable was the amazing supplies from Phee! The lace and elastics are so comfortable, and I’m sorry now that I wasted them on this pattern. Oh, well. After a break, I hope to try another bra…but not until I’ve had a chance to recover from this one.


Adventures in Foam: Marlborough Bra from Orange Lingerie

Hey Yall! It’s Nicki back with another bra! IT has been a hot minute since I shared a Phee bra but this is by no means My first one! If you haven’t seen them in the past check out my previous bralettes for the heavily breasted post which is still one of my all time favs!

Normally I stick to soft bras or wired bras with soft cups but recently I took a little bit of a detour and made one of my favorite bra patterns, the Orange Lingerie Marlborough Bra in a nude Phee lace and foam. It had been a hot minute since I worked with bra foam and I forgot both how fun and challenging it can be to work with!

The Marlborough bra has a fairly rounded shape a a built in power bra which is great for people like me who have Omega shaped breasts (breasts that are wider than the root) and works pretty well with the Phee heavy duty vertical wires with no adjustments for me at least.

It also features a pretty extensive size range, 30A to 40J, which is great! As someone who wear a “non-standard” size of 34H this is one of the few bra patterns that comes in my size that can actually be both cute and functional. I have made this bra a few times before and developed my fit to be near perfect for me with a few key alterations, the biggest one being splitting the bottom cup to add more depth to the cup. I like to do this on a lot of bra actually to help get a perfect fit for my omega shape. to be honest though I so think I made at least five muslins of this bra before finally perfecting my fit.

This is definitely a pattern for the more experienced bra sewist than a bralette but the instructions are really well written and walk you through the sometimes confusing construction of an underwire bra really nicely. I would say expect your first bra or too to be less than perfect no matter what pattern you are using however as you learn the techniques of lingerie sewing and find the right stitch width and length on your machine for all of the elastics and specialty fabrics.

I was on the hunt for a really wearable everyday t shirt type bra that could be worn for 16+ hours without becoming uncomfortable which is why I went for a foam bra to add a little more support and a beige/tan color that can be worn under just about any basic top I own. The Phee nude bra kit was perfect for what I was looking for and I think it turned out a very Wacol style everyday bra. Overall this bra took a bit longer than I was expecting but it turned out to be such a wearable and needed make that I am so glad I tackled.

Lining the Bridgette with powernet/techsheen

  This blog is focusing on the Made4Mermaids mama bridgette pattern. Powernet and techsheen are both materials that give stability and support which is perfect for lining bras. As the group has repeated many times, this is NOT meant to be a supportive bra, but seriously, a beautiful bralette in sizes for us who have HUGE milk pillows?!?!?! I’m all about it and unless I want this bralette to fit me like a girdle I will need to add support…..In comes powernet/techsheen.  Here’s how I create a clean lining on the racerback version.

1)  Cut 2 patterns, I do all the pieces. First with outer fabric, here I’m using white circular knit. Second with either powernet/techsheen, here I’m using white techsheen.

2) Right sides together serge the blue lines, leave top triangle and side open and both cups.

3) Serge both pieces, right sides together following the blue lines, leave out strap openings and bottom piece. Turn wrong sides together and topstitch same areas that you just serged.

4) Serge or baste, right sides together, the back piece, following the blue lines.

When open it will look like this

5) Insert bottom of the racerback in to the opening on the back piece, right sides together.

6) Serge the blue line.

7) Remember that wide opening from step 2 and the side opening from step 4? Great! Right sides together, opened up and serge.

8) Straps, the pattern is drafted to have a ‘V’ where the cups and straps meet, doing the step will remove the ‘V’.

Remember the opening near the straps in Step 2? Insert straps right sides together and turn the cups inside out. Top right picture shows the cups inside out with the straps inserted. Bottom right shows how much I serge off. Remember, when using fabrics other than galloon lace I like to add the straps into the back piece, figuring out what works for you would require a muslin, in the same fabric.

9) Topstitch around the rest of the pattern as one piece.

10) Finish up pattern following instructions.

Below is the video for the racerback:

Below is the video for the crossback: